Shaping and Wiring Bonsai
By Neil Padbury
www.shibuibonsai.com.au
Most gardeners recognise that pruning can be used to shape plants. Pruning can also be used to shape our bonsai and is often referred to as ‘clip and grow’
Pruning alone can:
Remove certain sections to allow other areas to grow better.
Direct growth by pruning at a bud or shoot that is growing in the desired direction
In bonsai we often want more control over the shape of our trees. Pruning cannot move an entire branch up, down or sideways to get it to the desired place in the overall tree structure. Often we can get better and quicker results with methods other than pruning.
We can shape plants simply by holding it in the desired shape. After a period of time the plant will stay in the required shape.
There are a number of ways to hold the shape of our bonsai while the set into the desired shape.
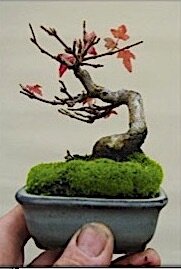
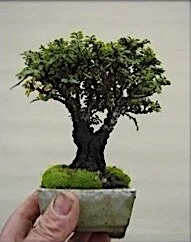
These small bonsai have been created just by selective pruning to redirect the growth.

Here you can see where the main trunk of the trident maple was cut off. What was once a branch is now the main trunk creating that natural looking bend.

Guy wires:
Branches or even trunks can be moved by pulling to the desired location with a wire or cord attached to the pot or another part of the tree. Guy wires are relatively quick and easy to apply but are limited in what they can achieve. Suitable for moving a part of the tree in one direction only. I’ve used several guy wires on this Japanese Red Pine to pull branches down and across. You can see that I’ve used several different materials for the guys. Some have been anchored to wires through the drainage holes in the pots, some to a convenient jin. Guy wires can be tied to other branches, roots, or onto the pot.
Plastic training pots are particularly hole anywhere on the rim of the pot suited to guy wires as you can make a to pull in exactly the right direction. Tying a wire around a ceramic pot can give suitable spots to tie-down guy wires and occasionally I’ve threaded a wire up through the drain holes in order to pull a branch using a guy wire.

Occasionally screws are screwed into the trunk to provide an anchor for a guy wire where there’s nothing else to tie to. The screw does not hurt the tree and the hole will heal over after the screw is removed.
One thing that is difficult to achieve with guy wires is bending the tree in more than one direction. That’s where traditional bonsai wiring really comes into its own.
Traditional spiral wiring:
Wires are wrapped round the trunk or branch in a spiral. When the tree is bent the wires hold the bend in place until the tree grows into that position.
Picking the right size wire to hold any given part of the tree is something that comes with practice. Try flexing the area with your fingers to feel how strong that part is. Then compare to various wires to find one that is marginally more difficult to bend and use that one to wire that section. If you have wired the area and bent it but the tree just flexes back do not despair. A second wire can be added beside the first to give extra holding power.
Copper V aluminium:
Copper wire has been the traditional choice for bonsai shaping for many years but now aluminium wires are available and are widely used. Copper tends to be a little stronger than aluminium so we can use thinner wires to hold the same branch.
Many now favour aluminium because it is generally softer so is easier to bend around the tree. Copper tends to fade to a dull brown so is not quite as intrusive when used on a display tree. Copper has a characteristic called work hardening.
When it is bent the metal becomes stiff and hard. That’s great when we use it to bend the trees because the copper wires are easy to bend into position but the bending stiffens the wires to give extra holding power. It is not quite so good when the wire has already been work hardened by previous use or in the manufacturing process.
Annealing is the process of heating copper to reset the molecules and soften it again. If you buy copper wire for bonsai make sure it is ‘soft’ or ‘annealed’ for ease of use. If you are like me and like to reuse and recycle you’ll need to learn to anneal your own wire which is quite a simple process.
The right time of year:
Most trees can be wired and bent any time of year. It is far easier to wire deciduous trees when there’s no leaves to get in the way of the wiring and you can see what you are doing so winter is a good time.
Some growers have found that when trees are bent in spring and summer occasional branches die off afterwards. This is generally the result of bark slipping. When the tree is active the cambium layer between bark and wood is also very active and the outer bark is only very loosely attached. Bending at this time can separate the bark from the wood which disrupts sap flow and kills the branch. Gentle bending usually won’t hurt but major shaping is best left until the tree is less active – late summer through winter.

This shimpaku juniper is much too straight to be a good bonsai.
Applying wires to your bonsai:
Don’t bother putting wire on your bonsai unless you need to change the shape. Some beginners seem to think that a bonsai is not real unless it has wire on it and just seem to wire for the sake of wiring. Wire is only used when a part of the bonsai needs to be reshaped and it will be removed as soon as the shaping is done.
First identify the area you need to shape. Determine the flexibility of the area with some experimental bending and select appropriate wire.
Allow about 1/3 more length than the section you intend to wire. You’ll need more when doing thicker trunks. Experience is the best teacher to determine appropriate lengths.

The photo at right shows the wire I selected and cut to length. I’ve pushed one end right down into the pot as the anchor. I want to bend the entire length of this trunk so I’ve wired from base all the way to the apex.
Find a convenient location to secure the wire. When wiring a trunk I usually poke one end of the wire into the soil at the base of the trunk but when wiring upper parts a turn round a nearby branch could be a suitable spot to secure the end of the wire.
Hold the wire against the trunk with one thumb and finger while using the other hand to bend the wire round the trunk in a spiral. After a turn or 2 you should move the anchoring hand up to hold closer to the bending. Continue to bend the wire round the trunk and moving the other hand up to support the bends.
A consistent spiral not only looks good but it helps to support the wood during bending and helps prevent breaks. 45 degree spiral is usually recommended but I think mathematically those good spirals are probably closer to 60 degrees. Try to get your wires snug and reasonably tight against the bark Again this looks better and also supports the wood and prevents untimely fractures.

This wire is too thin to hold the trunk but there’s a branch about hallway up that I also want to bend so I add a second wire to the trunk and wire the branch with it.
When applying more than one wire try to plan your application so that subsequent wires run alongside the previous ones. Not only does it look neater but crossing wires put additional pressure on the bark and can leave permanent marks. Generally start with any trunk wires. Then apply wires to the lower branches if required and work your way up the tree to finish with the higher branches.
Now the 2 wires together on the trunk will be strong enough to hold that trunk. The single wires will be able to hold the bends in the thinner upper sections.
Making the bends:
Hold either side of the area to be bent. Gently bend to the required shape. Take your time. You will quickly find that different species have very different characteristics. Some trees are quite flexible and can be bent easily into quite tight curves. Others are stiff and brittle and may crack or even snap off completely when bent. With a little experience you will be able to feel or sense the wood reach its bending limits and stop in time. Usually a break is only a temporary setback as most trees will grow again from below the broken area. If the break is not complete the tree will often survive. Leave it alone as it is. The wound will often heal up and disappear in a few months. Some growers use wound sealer or even super glue to help the wound heal.

You can also achieve tighter bends by bending in stages to allow the cells and fibres to adjust. Bend as far as you dare then put the tree aside to rest for a few minutes or a few days then continue to bend. You should find you can now tighten up those bends much more without breakages.
Here’s the same juniper. After resting overnight I was able to tighten up all the bends without breaking the trunk
Here you can see the results of bending with the double wire. The bends are not quite as tight as I want but I’ll leave this one to rest for a day or 2 then come back and bend it further with less risk of breaking the trunk.
All wood is composed of fibres and cells that are stretched and compressed when we bend part of a living tree. The wood will snap when those fibres and cells reach their limit. When making tighter bends it helps to also twist which helps redistribute the tension and compression and ill allow you to achieve tighter bends.
Having the tree just slightly dry also seems to improve flexibility. Trees with cells full of water seem to snap far easier than drier ones.

Wiring branches:
In the initial trunk shaping phase you’ll want to set the shape and angle of the entire branch so apply a wire along the main branch. Another branch makes a convenient anchor place and you might as well cut the wire long enough to wire out along that branch too thus wiring 2 branches with a single piece of wire. This works best when the wire does at least a full turn round the trunk before going out onto the second branch so I often don’t use the closest branch but go up the trunk to a branch a little further away so I get those anchoring turns round the trunk.
How long will the wire stay on?
This depends on many things. Thin, new shoots on trident maple can be set in place after a week or 2. Older and thicker branches may take several months to stay put. Cedars are notorious for their elasticity and sometimes take years to set. The best way is to look at the wired tree every week or 2. When you see that the bark is starting to bulge around the wire a little, even in a few spots it is time to take that wire off. If the tree tries to return to the original shape you’ll need to wire and bend again until it stays put.

What happens if I’ve left the wires on too long?
Most of us have done this at some time. The wire does not usually kill the branch but the growing bark swells up either side of the wire. If you remove the wire at this stage the bark will have a spiral groove which never looks very nice. Best to avoid this through regular checks and remove all wires before they mark the bark. If you have wire marks they do gradually disappear. It may take years but they will eventually be erased by the growth of the tree.
Spiral wire marks on the trunk of a Cotoneaster horizontalis. Fortunately the trunk is still quite thin. These marks should disappear as the tree grows and the trunk thickens.

If the wire has been on so long that the bark has grown right around the wire it can be difficult to remove the wire without extensive damage to the bark. In this case just remove the sections of wire you can safely cut and leave the rest embedded in the tree. It won’t kill the tree, in fact some pine growers use this technique to produce pines with thicker, gnarly trunks where the tree has grown over a trunk wire. Embedded wire will cause localised thickening and reverse taper so best to avoid this rather than have to rectify afterwards.
Some tips for shaping bonsai:
Try to avoid gentle S curves: They look boring and that’s not really how trees grow. Natural bends are random – some wider, some gentle, back and front as well as side to side. Bends do not all need to be as exaggerated as the ones above but make an effort to make your bonsai bends interesting.
Make 3D bends: Branches (and trunks) look more natural when the bends go backwards and forwards as well as up and down.
Bends tend to disappear as the trees grow. Sounds strange but it appears that sap tries to take the shortest path from roots to leaves. This means the tree grows more on the inside of bends and less on the outer edges. As the trunk thickens bends tend to soften and appear to straighten. Allow for this when bending very young trees by exaggerating the bends so there will still be some movement after the trunk has thickened. The stylized representation at on the right shows this. The original thin trunk (black) has thickened (blue) more on the insides of the curves resulting in a straighter trunk.
It generally looks better when curves diminish in size and radius as we move up the tree. Really tight curves near the base and sweeping curves above does not look so good.
Match branch shape with the trunk shape: A strongly bending trunk looks better with branches that also have bends and twists. If you think about the elements that created the trunk the same weather and conditions also influence the branches as they grow so it makes sense both should have similar shaping.
It can be very worthwhile doing some practice before attempting to wire your precious bonsai. Cut some twigs from a garden shrub to practice on. That way if you break your trial piece you won’t be too disappointed. Keep practicing until you are happy that you can apply wire in neat, even spirals and can bend the section without breakage. Just remember that different species may be more or less flexible than your trial pieces.
Don’t try to unwind the wire: Unwinding wires is a good way to break parts of your tree and bonsai wire is cheaper than your tree. Use wire cutters to snip the coils so the wire falls off.
Don’t try to reuse copper wire: After bending the wires become stiff and they will be more difficult to apply. Kinks and abrupt bends will also put pressure in places and leave marks on the bark. Copper can be annealed by heating to return it to working softness. I believe that aluminium wire does not work harden so you may be able to reuse it after straightening out any kinks.

Here’s a branch on a Japanese Black pine fully wired to arrange all the smaller twigs. A thicker wire comes along the main stem so I can bend that. Thinner wires have been used on the smaller twigs. It is hard to trace the wires but each wire is anchored to another similar sized twig or branch for stability. 1 wire runs from A to B. Another wire goes from C to D allowing me to bend and realign any or all of these small twigs.
This article from Bonsai Tree has some good tips and great photos of wiring:
https://www.bonsaitree.co.za/blogs/tree-talk/5-top-wiring-tips-for-your-bonsai-trees